

 aA Creative Team member, Miki, shares her Artsy Brushes Layout Foundation Tutorial in Adobe Photoshop Elements.
This Artsy Brushes Layout Foundation Tutorial may also be followed using Adobe Photoshop.
Artsy Brushes Layout Foundation Tutorial
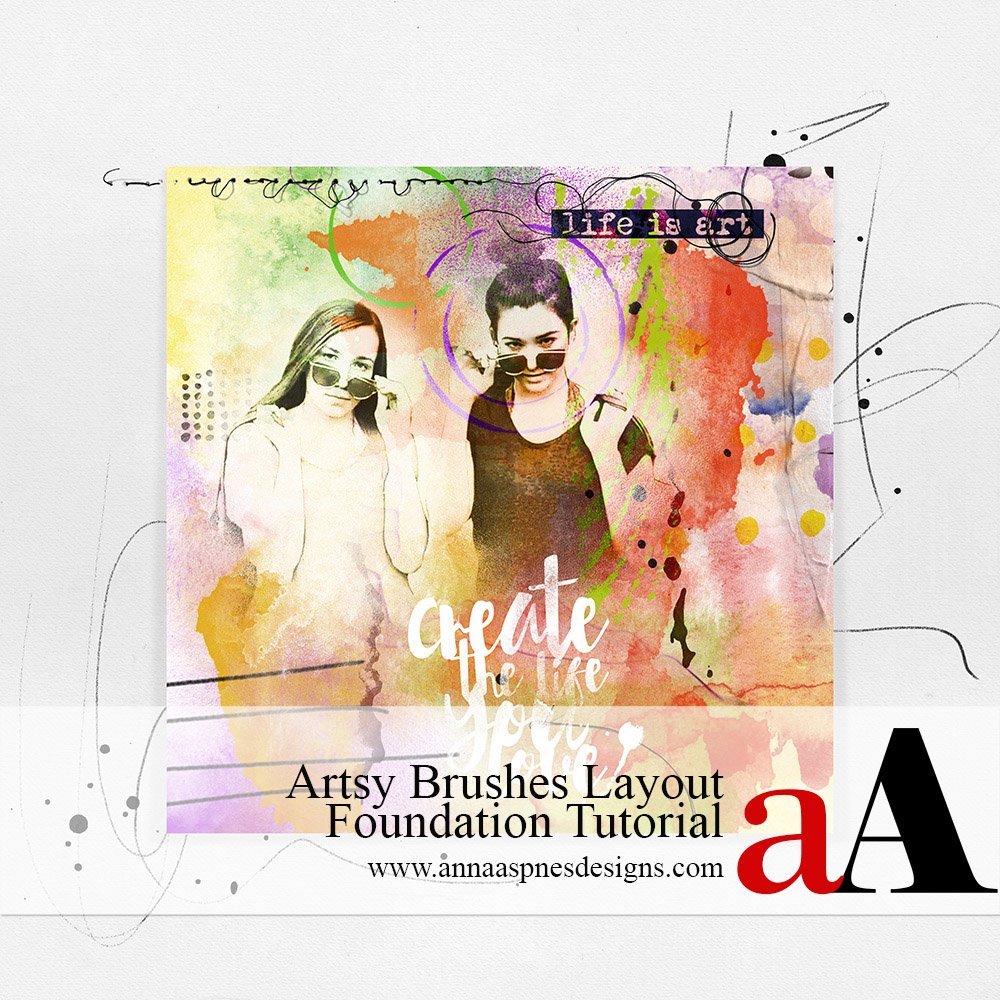
This design was WAY out of my comfort zone as I usually use neutral tones for my pages.
But in Anna’s words:
“Growth happens in that place where you are most uncomfortable.”
These two girls are so much fun and full of energy. I wanted to create something with lots of color that reflected their dynamic personalities.
The background to my design was created using various brushes and a little ArtPLAY and is outlined below in this Artsy Brushes Layout Foundation Tutorial.

1. The ArtsyPaint Foundation
Create the artsy brushes layout foundation for use in a artsy digital scrapbooking or artistry layout.
- Create a New Layout at 300 DPI. Go to File> New.
Tip. Choose a size that works for you – An 8.5 X 11 inch size was used in this case, to allow for some flexibility in clipping the artsy foundation to a 8 X 8 inch mat later in the process.
- Stamp a variety of brushes from the ArtsyPaint No. 14 on New Layers using the Paint Brush tool from the Tools panel.
- Layer the brushes on top of one another then use the Move tool to re-position as preferred.
- You can also ROTATE and RESIZE.
- Recolor each image. Go to Edit>Fill Selection tool.
Note. Different colors were applied to the brushes until I felt there was a balance of color.

2. Embellish with Brushes
Add visual interest to the basic artsy brushes layout foundation using a variety of brushes.
- Add more brushes from the various DifferentStrokes and Artplay Palettes to enhance the shape and depth in the artsy brushes layout foundation.
- Use the Scatter feature with the Paint Brush tool, and recolor as preferred, to create greater visual interest.
Learn more about Brushes in the aAdvanced Brushes workshop for Photoshop and Elements.

3. Texturize
Build depth and dimension in the artsy brushes layout foundation through the addition of texture.
- Add brushes from PaperTextures No. 6 and Spackle Textured No. 7
- Position the textures to that the edges align with those in the ArtsyPaint layers.
- Choose colors that co-ordinate with those in your artsy layout foundation.
- Change the Blending Mode of some of the layers to Color Burn, for example.
Tip. Save this image as a .psd file so you can go back and make changes at any time, then create a composite of the image.
Go to Layers Palette> Merge> Visible and save as a .jpg file, or press Shift + CTRL(CMD) + E on your keyboard.

4. Incorporate into a Layout
Use the composite to create the foundation of a new artsy digital scrapbooking or artistry layout.
- Create a new 12 X 12 layout at 300 DPI and use set the solid paper of choice as your foundation e.g. SolidPaper6.jpg from Artplay Palette Artsy .
- Make an 8 X 8 square using the (Rectangular Marquee tool from Tools panel, and fill with a color of choice e.g. gray.
- Apply a Drop Shadow Layer Style to the square to yield dimension. Go to Layer> Layer Style> Drop Shadow (Photoshop) or Layer> Layer Style> Style Settings> Drop Shadow, and adjust the options as preferred.
- Move the composite layer on top of the square mask layer, and press CTRL(CMD) + ALT (OPT) + G (Photoshop and Elements 15+) or CTRL(CMD) + G (Elements), to clip the layer to the mask layer. Notice that the image conforms to the shape of the underlying layer.
- Employ the Move Tool to move the composite layer, vertically and horizontally over the mask to find the most visually pleasing position.

5. Add Graphic Image
Apply filter to a photo to create an edgy image that coordinates with the abstract background.
- Convert a photo to black and white.
- Duplicate the image layer. Go to Layer>Duplicate Layer or press CTRL (CMD) + J on your keyboard.
- Change the Blending Mode to Hard Light, and duplicate as preferred.
- Apply a Poster Edge effect from the Filters menu. Go to Filter> Artistic> Poster Edge.
- Stamp multiple brushes from AnnaBlendz Artsy No. 10 on New Layers, re-position and then merge, to create a custom clipping mask.
- Recolor the custom clipping mask to WHITE. Go to Edit> Fill Selection, and ensure the ‘Preserve Transparency’ box is UNCHECKED.
- Clip the 3 photo layers to the mask and group the layers.
- Select the 3 layer in the Layers panel and go to Layer> Group Layers.
- Select the Group Folder and change the Blending Mode to Hard Light.

6. Finishing Touches
Complete you layout with more Brushes, WordArt and Embellishments.
- WordART, Textures, Stitching, Artsy Transfers, MultiMedia Elements and Brushes from the aA store.
We Dare You?
Miki was brave enough to share this Artsy Brushes Layout Foundation Tutorial which demonstrates that we can ALL step outside our digital comfort zones.
Share your ArtPLAY adventures and your approach to this tutorial here.


Recent Comments