


Today, I’m sharing 5 Ways to Use Stitched Templates.
5 Ways to Use Stitched Templates
Introduction
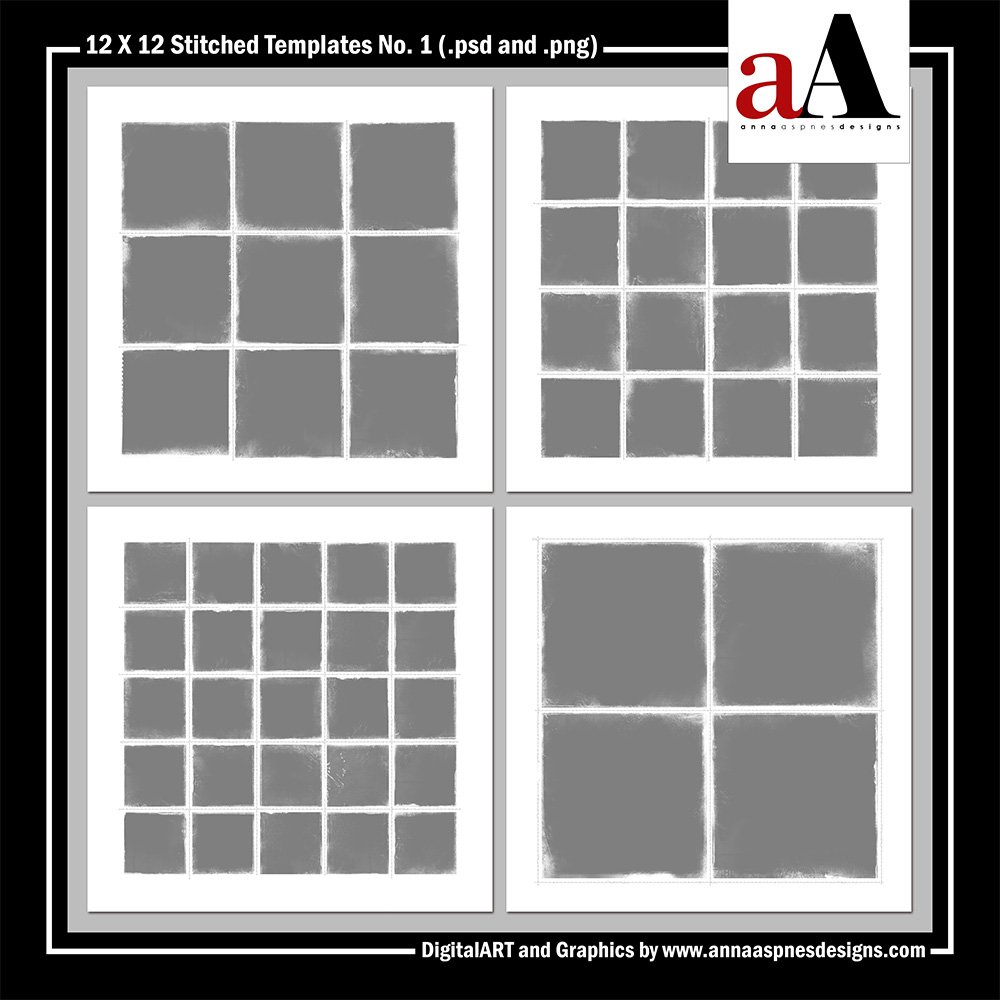
Use the 12 X 12 Stitched Templates No. 1 to create your next photo artistry layout.
- There are 4- 12 X 12 Stitched Templates in this collection
- Templates are delivered in BOTH .psd and .png format.
- Clean AND distressed masks are included.
Note. The .png format masks are delivered in SINGLE layer format.
- Ensure the mask layer is selected in the Layers Panel.
- Create a selection of the mask using the Rectangular Marquee Tool or selection function of choice.
- Go to Edit> Copy (CTRL/CMD + C) the Edit> Paste (CTRL/CMD + V) to copy/paste each mask to a New Layer.
- Reposition each mask copy using the underlying ‘master’ mask layer as a guide.
Ideas for Use
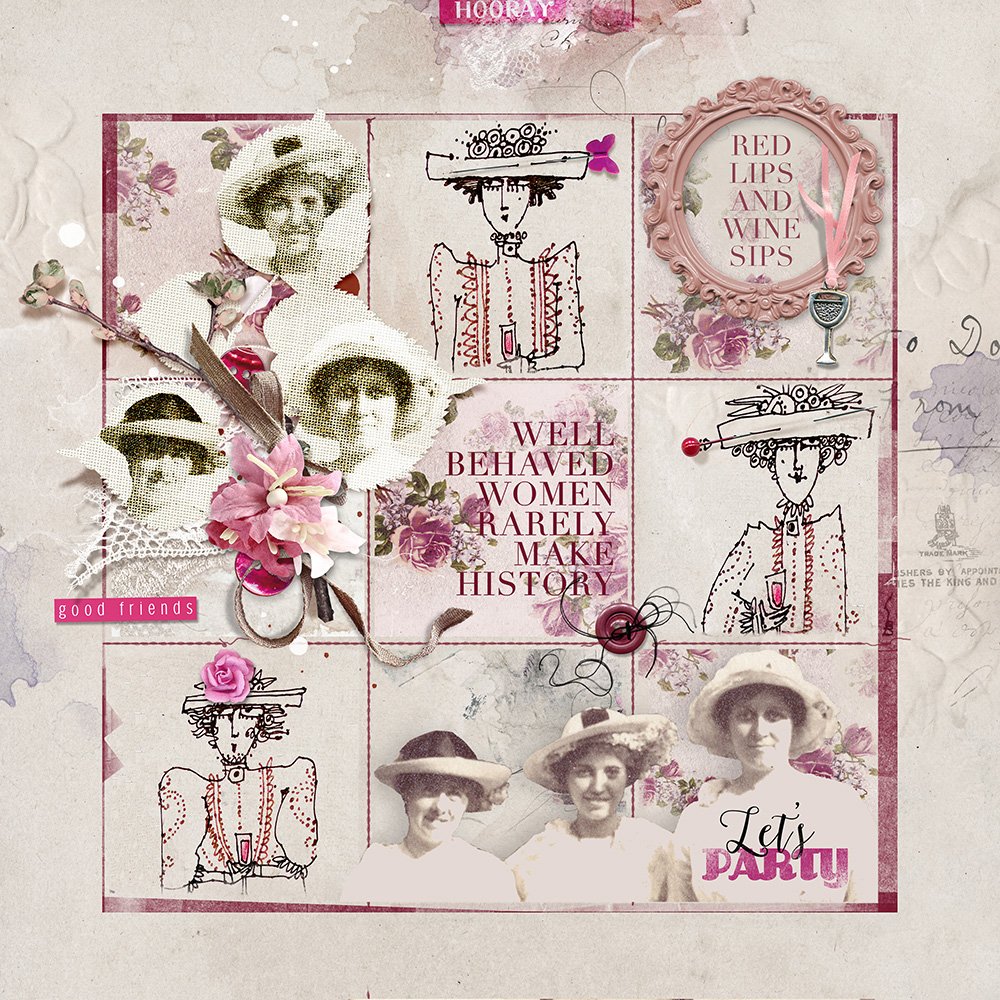
Well Behaved | Miki
1. Recolor Stitched Frame
Use a Color Overlay Layer Style (Photoshop) or a Solid Color Adjustment Layer in (Photoshop and Elements) to recolor white stitching.
In Photoshop:
- Select the ‘stitched overlay’ layer in the Layers Panel.
- Go to Layer> Layer Style> Color Overlay.
- Click on the Color thumbnail to activate the Color Picker.
- Select Color or sample from your photo artistry layout design, images and/or DigitalART supplies.
- Set the Blending Mode to Multiply or Linear Burn.
- Modify the Color as preferred.
Note. You can also apply a Solid Color Adjustment Layer from the bottom of the Layers Panel and follow the Clipping Mask instructions below.
In Photoshop Elements:
- Select the ‘stitched overlay’ layer in the Layers Panel.
- Click on the ‘Create New Fill or Adjustment Layer‘ icon at the top of the Layers Panel.
- Select Solid Fill option from the fly-out menu which activates the Color Picker.
- Color or sample from your photo artistry layout design, images and/or DigitalART supplies.
- Click OK.
- Go to Layer> Create Clipping Mask.
- Set the Blending Mode of the Solid Fill Adjustment Layer to Multiply or Linear Burn.
- Modify the Color as preferred by clicking on the Solid Color Adjustment Layer thumbnail in the Layers Panel.
Tip. Embellish the newly colored stitched frame with your favorite DigitalART elements.
- Click on the ‘eye’ icon to the left of each mask layer in the Layers Panel to turn OFF the visibility of that layer.
- You can turn off the visibility of any layer in the templates.
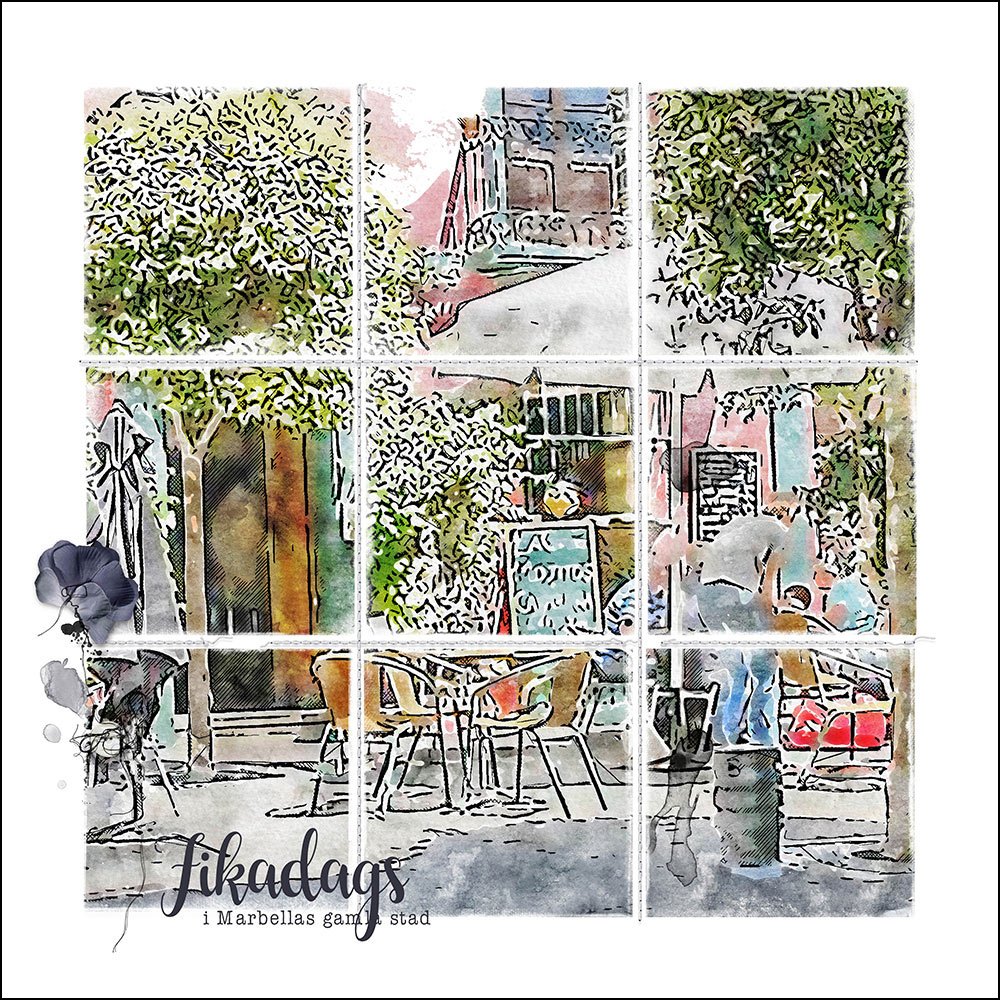
Fikadags | Ulla-May
2. Single Image Masking
Clip a single large image over multiple mask layers.
- Move and position image/photo so that the edges of the image extend ALL mask layers.
- Drag the image down the Layers Panel so that it sits directly above the first mask layer.
- Go to Layer> Create Clipping Mask to clip the photo layer to the mask layer.
- Duplicate the photo layer by dragging to the ‘New Layer‘ icon in the Layers Panel.
- Move the photo ‘copy’ layer on top of the next mask in the Layers Stack.
- Repeat the Clipping Mask and Duplication process until all masks have been filled.
Note. You can apply app effects and filters to your image as preferred.
See also:
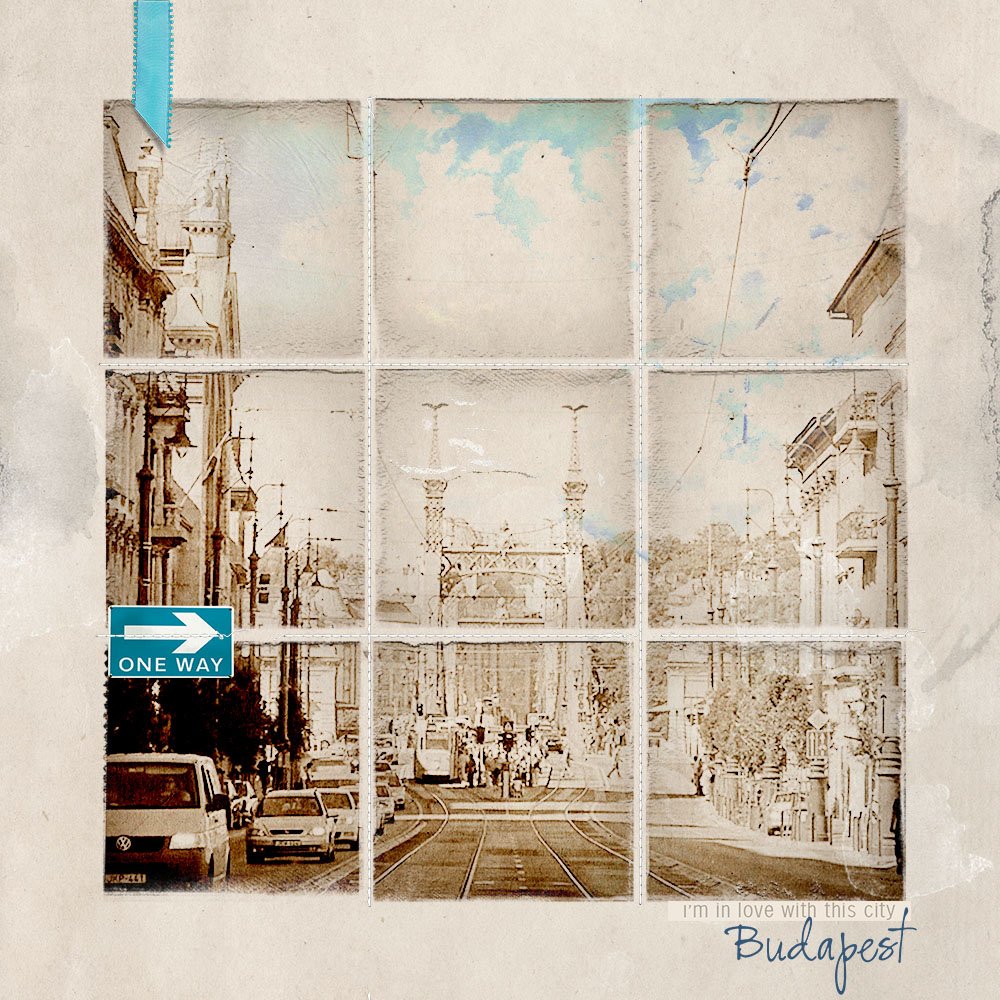
Budapest | Margo
3. Apply Special Effects
Easily apply Layer Styles, Blending Modes and Adjustment Layers to ALL the masks.
- Negates Repetition of applying the same effect to each individual mask layer.
- Enables you to better Organize and Manage layers in your Layers Panel.
- Simplifies the using Templates with multiple mask layers.
Learn how to use Groups with your Templates for a Limited TIME here
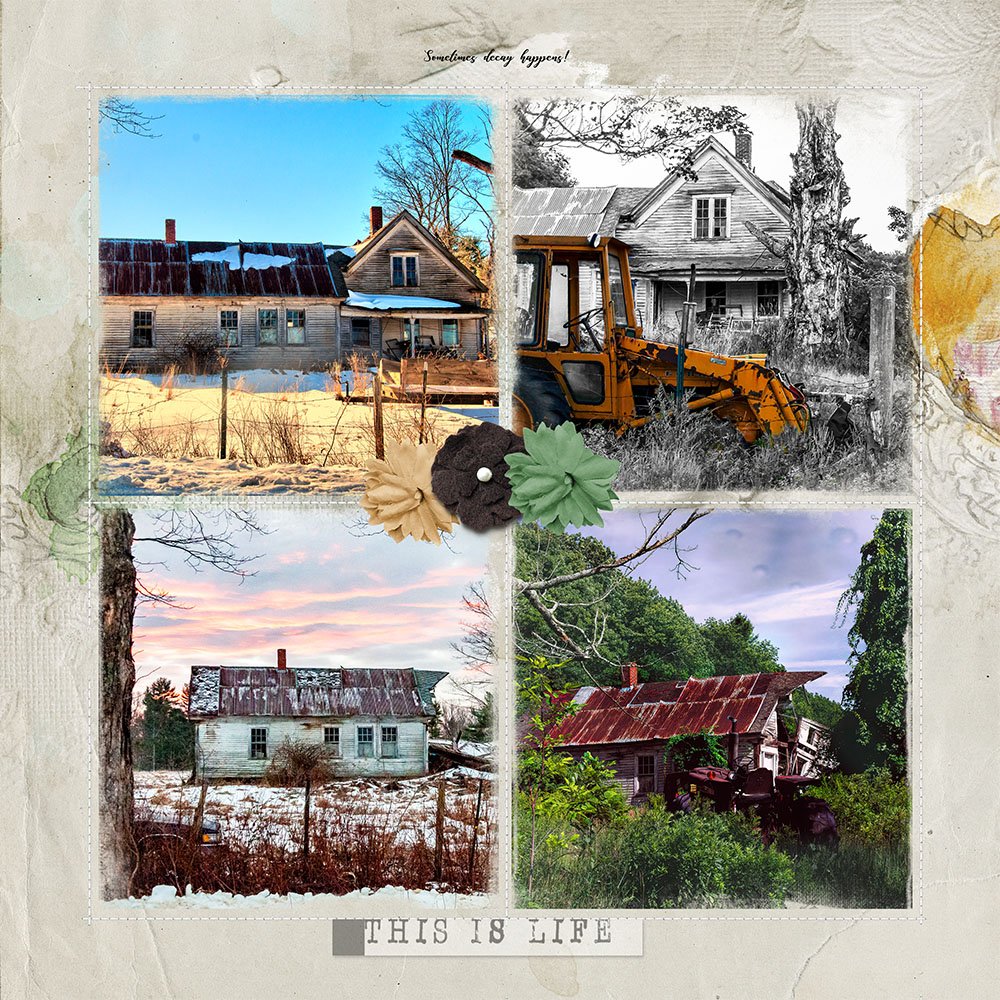
This is Life | Joan
4. Embellishment Matters
Place and position elements to accentuate your photo artistry layout design.
- Provide Context in the form of words and support the Theme of your page.
- Lead the viewers eye around the layout design.
- Unify images and create Balance.
Notice. How the elements at the center of the page draw the eye into the composition and create UNITY between all four very different images.
See also:
- Placement of embellishments is shown in detail for a Limited Time in this video.
- Element Properties and Design Principles
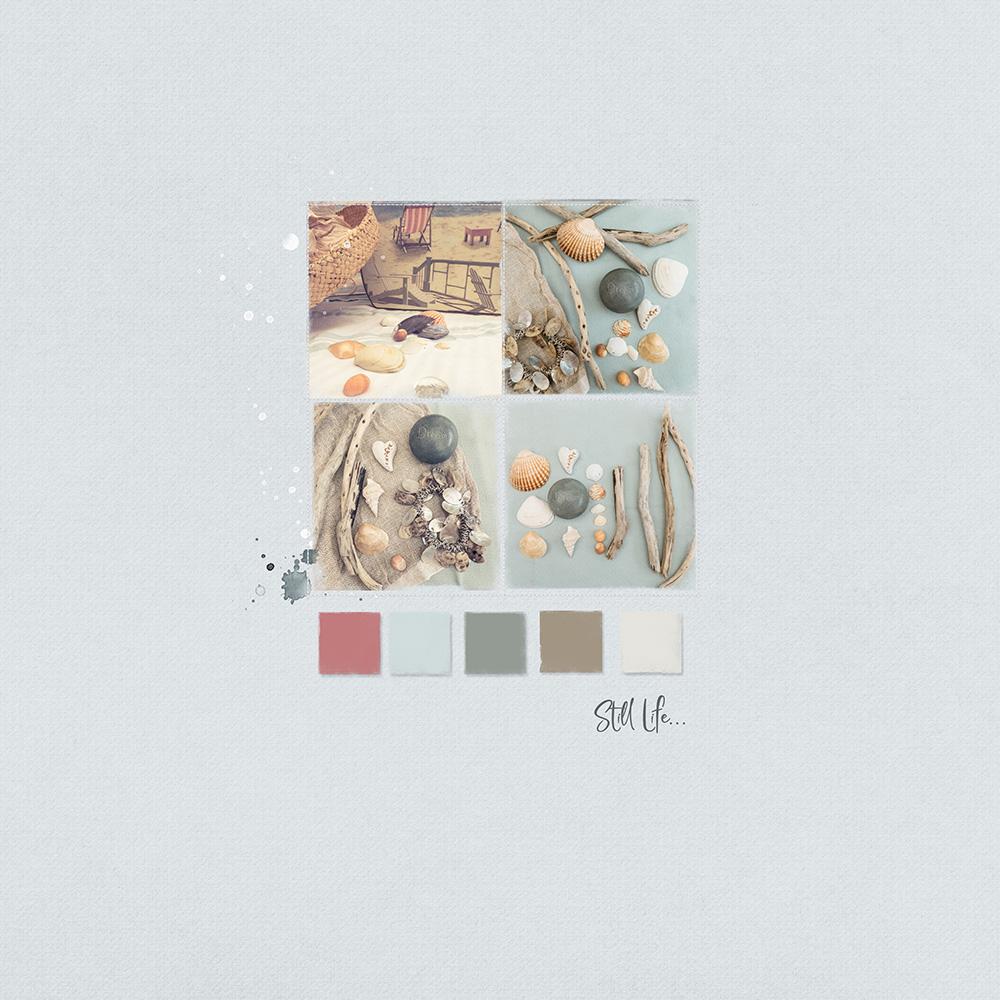
Still Life | Viv
5. Modify Elements
Use the tools in Photoshop and Elements to make simple adjustments to the individual layers.
- Resize and Reposition the masks in any configuration.
- Modify the stitching using the Eraser Tool and a Hard Round brush to accommodate new mask placement.
- Recolor the mask layers and apply a Drop Shadow Layer Style to create embellishment.
Try This. Create color swatch embellishment for your photos.
See also:
Summary
You can modify the layers in the Stitched Templates to create infinite layout designs.
- Practice the techniques outlined above until you get comfortable with each one.
- Incorporate additional DigitalART products and approaches as your confidence grows.
- SAVE 20% on these 12 X 12 Stitched Templates No. 1 for ONE WEEK ONLY.
We invite you to share your pages using 5 Ways to Use Stitched Templates in the AnnaGallery.


Recent Comments